Sunday, December 26, 2010

Several months ago, my brother said to me in his usual way: "make me a toque."

I looked at him, puzzled.  I'd never heard of a toque before.  Little I knew that "ear flap hat like they wore in Fargo" was technically called a toque.

Unfortunately his request was received when I was just starting to knit for some baby shower gifts and ultimately I decided to knit him his hat as part of his Christmas present.

I asked him what type of toque he wanted and he sent me this picture.... the Tough Guy's Toque
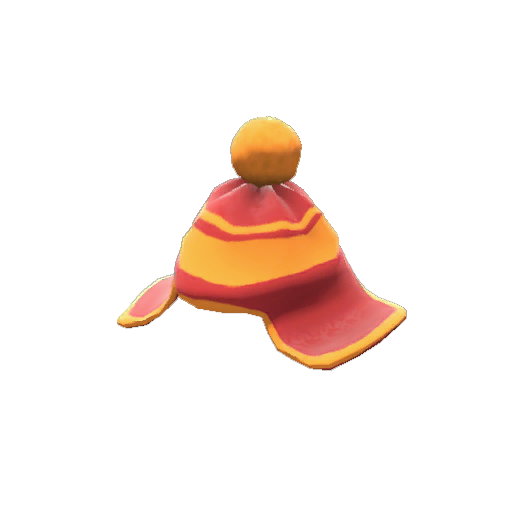
WTF.

Several google searches of toque hats did not produce one quite the shape of this hat.  The flappies are wider and the crown seems to be shorter than most of the toques I could find.  I'm sure that there is one that I could have made do with, but when I'm trying to replicate something I tend to get really anal retentive about it.    So I decided to make up my own pattern.  I essentially did the knitting version of playing a song by ear.  I kept a photo of the toque in front of me and started knitting.  I did some initial measurements to figure out what I would need to cast on in order for it to fit his head and figured out the size of the flappies based on the overall size of the hat.  I printed out the picture and took some measurements to get a general idea of the proportions for the stripes.

Finished hat on my brother

Here's how I did it:

I used Caron Simply Soft in Red and Mango, less than 1 skein of each (though not much less :p) and US 8 circular needles. 

On 8s the gauge of this yarn is 18 sts = 4 inches.  My brother has an unusually round melon, and I asked him to measure his head so I could make sure it had the right fit.  Good thing too, the average hat pattern is based on an average adult head circumference of 19 inches, and his is 24 inches.  So did a little math and ended up with needing to cast on 108 sts for the brim of the hat.

When I looked at the original picture, it appeared that the flaps were a each at least 1/4 of the overall circumference of the hat.  So I divided 108sts by 4 to figure out the starting point for my flappies (27 sts each).  Since I wanted them to flare a little bit I cast on more than 27 (but I honestly don't remember how many more) then after a few rows I decreased so that I was at 27 sts.  I started out with about 4 rows of the Mango, then joined in the Red.  I opted to work with two balls of Mango, one on either end, rather than running the Mango along the backside of the flaps.  I started out doing it that way, but because the Simply Soft is so soft, I found that it pulled too easily with the additional yarn woven behind, thus distorting the shape of the flap.  I kept a border of 4 sts of Mango on either end, while working the Red in stockinette until the flaps measured about 4 inches (once again, I don't remember exactly how much, but it's around 4).

I moved the first flap to a stitch holder while I worked the second one, then with both ready, I started the brim by casting on 27 with mango, knitting across the 27 sts of the first flap (keeping with the mango border/red main section pattern), casting on another 27 sts in mango, and knitting across the 27 sts of the second flap, just as I did the first.  I then switched over to red and continued to knit in the round until the red section measured about 2 inches.  I changed to mango, knit 4 inches, then switched to red for an inch, back to mango for an inch, and then back to red for the last 2 inches, over which I shaped the crown of the hat.

Then made and attached an orange pom to the top and wove in the ends.  And voila!  Tough guy touqe replica!


Wednesday, December 15, 2010

I realized today I haven't posted anything in a while (ok, a whole month)... but I have a few good excuses.  First of all, it's almost Christmas and I've been hard at work on knitting some Christmas gifties.  Second, my laptop kicked the bucket sometime around Thanksgiving and I'm eagerly awaiting Santa's visit as I hear there will be a new one under the tree for me.  As such, I'm sans place to upload photos to as I'm on a borrowed laptop that I don't want to bombard with pictures of my knitting.

Well, okay... maybe just a few...

Why yes, that is a beckoning cat in the background...
My dear friend Audra is expecting her first baby in February, and her shower was on Black Friday.  Audie is expecting a little boy, which is super exciting for me as I've only been knitting for little girls.  :p

When I saw this tutti-frutti colored yarn (Bernat stretch) I absolutely had to turn it into something for baby.  This is the first time I've knit something entirely off the top of my head and not following a pattern.  I think it turned out pretty cute... and here's hoping it fits!


The inspiration for the whole project!

More importantly, a baby boy finally gives me a reason to use this!  Many many months ago I was in JoAnn's buying yarn, and found this adorable blanket binding on the clearance rack.  Seriously got the whole thing for something like three bucks.  It was awesome.  But I had nothing to do with it and so it has sat on a shelf waiting for Audra's happy news. :-)   

Since she's having a winter baby, I wanted to knit something super soft and snuggly to keep baby warm.  I wandered the yarn aisle, groping skeins, until I found the perfect textures in colors that coordinated with my blanket (Lions' Brand Quick and Cozy in Oatmeal and Velvetspun in Bluebell).

As with the hat, I didn't follow a pattern.  I knew I wanted stripes, and decided to alternate stripes of garter stitch and stockinette to play up the difference in textures.  For a blanket, this was a pretty quick knit, thanks to large needles and bulky weight yarn. :-)  However, when it came time to stitch on the binding, my sewing machine and bulky yarn were not making nice, and there were a lot of stops and restarts and frustrated grunts on my end.  I did not get the binding stitched on quite as I would have liked... but all in all happy with how it turned out.

Blanket without binding
Finished blankie with binding... and my newest DSW order waiting to be opened. :p
funky monkey


Then to go along with the blankie, I decided to use the left over yarn to knit up a stuffed toy monkey.  Once again, didn't work with a pattern, just knitted two balls, one a bit smaller than the other, then created arms/legs and hands/feet by knitting an I-cord then flaring it out at the ends to sort of make little balls at the end of each limb.  Once I got the ears/face done he sorta turned out a little more bear-ish than I intended... almost like the love child of a bear and a monkey... but still cute.


Sunday, November 14, 2010

I always wanted to learn how to knit.  It just looked so... magical.  I was mesmerized by people who could take some yarn and two sticks and make something out of that.  Unfortunately my mother was not a knitter, and even if she was she is a lefty and I am a righty and that just wasn't going to work.

Finally in 2003 I decided I'd just teach myself to knit, so I went out and bought some yarn and some needles and a freebie pamphlet with some very rudimentary knitting instructions.  It did not work out.  I couldn't get beyond the slip knot.  I tried, but no matter what I did I just couldn't get the hang of it.  Dismayed, I put the yarn and needles away and eventually threw them out when I moved the following year.

Several years later I was in the fabric store when I noticed that yarn and needles were on sale.  Determined to learn how to knit, I bought a skein of Red Heart yarn, a pair of metal size 8 needles and a Lion Brand booklet on how to knit.  I fought with it for hours until something clicked and I was knitting.  Slowly I started to knit my first scarf - a skinny scarf knit in alternating wide strips of stockinette and garter stitch. 


I still have that scarf and just found it today when unpacking a box of hats and scarves, dug out of storage for the winter.  I haven't worn it since I made it; in my impatience to finish my first project I made it a bit short and besides, it looks like a 7 year old knit it.  Seriously.  The edge is sloppy because initially I knit wonky, not quite understanding what it meant to insert your needle into a stitch from back to front.  As a result my turns at the end of each row were loose and messy.  There are numerous dropped stitches that I didn't notice while knitting - and even if I had, I wouldn't have known how to pick them back up, save for unravelling the whole thing and starting all over again.

Stitch tension?  What was that?  I held my working yarn between my thumb and forefinger, awkwardly, until one day a knitter friend showed me how to wrap it around my hand and hold it so as to control my stitch tension.

I also knit a coordinating hat, which turned out better than the scarf.  I suspect a large part of that is my messy edges were concealed in the seam of the hat!


Oh, and I still think knitting is magic. 

Saturday, November 6, 2010

Turtles were always a fav of mine, since I was 8 and my little brother and I adopted two box turtles who wandered into the garden.  However, they took on a whole new meaning to me when I started at the University of Maryland, as our mascot Testudo is, basically, a turtle.  Technically it is a diamondback terrapin (a species of turtle indigenous to the Chesapeake Bay watershed) but to-may-to, to-mah-to, right?

My social life in the fall is centered around Maryland football and tailgating.  So, when the previously mentioned bestie found out she was preggers, I wanted to knit baby something to bring to her first tailgate.  It's a very important milestone in one's life, after all.  So I set out to knit baby a Maryland colored tailgate blanket.

And then I found this guy (on KnitPicks): 

A knitting pattern for an absolutely adorable stuffed turtle AND he has costumes.  I fell in love immediately.

While my bestie was busy growing a baby, I was hard at work knitting my own labor of love.  And let me tell you, while adorable this little guy really tested my patience (much like a kid, I suppose).

I was incredibly daunted by this project.  It's one of the most challenging projects I've taken on so far.  Once I got started, I was deceived, as the turtle head and body are knit in one piece, and fairly easy to do.  (I opted for stitching his eyes instead of using plastic safety eyes, as it was intended for an under 3 year old.)  My biggest challenge here was keeping my stitches tight while sewing in the round in teeny tiny size 3 DPN's.  I have short, fat fingers, so sometimes I'm not the most nimble when using smaller needles. (As with any stuffed knit toy, you have to be sure your stitches are very snug, otherwise the stuffing sticks through.)

After the head/body are done, you knit up four legs.  This was quick and easy.  They then get set aside while you knit the rest of the turtle.  It's very important the legs go on in just the right spot, otherwise you can't fit the shell (or any of the costume shells you might make for him) on, so you have to wait until you have an idea of where on your turtle's body the leg holes in the shell will sit.   What I did - and often do on any project with legs - was sew on one leg using the cast on tail and a tapestry needle, then, with yarn still attached, stuck the needle all the way through the body and out on the other side (you have to squish the body together a bit to get it through), parallel to where the first leg was.  It helps to cross check by counting the number of stitches from the top of the turtle down the side to ensure you're in about the right spot.  My legs had loops along the cast on edge which I used to anchor the leg to the body.  I basically stitched it on and treated the loops like numbers of a clock, and sewed "12" to "6", then "8" to  "2" and "3" to "9".   I found this got the leg on nice and secure with even tension. 


The shell is knit in three pieces - a shell top and bottom which are sewn together and stuffed, then a shell attachment panel, designed to slide over the turtle's body like a shirt.  When first looking at the pattern what was most intimidating to me was the pattern on the shell, but that turned out to be the easiest part!  The part I thought would be the easiest, the shell attachment panel, was my biggest challenge.  I kept mis-counting the increases and decreases... had a few dropped stitches... it was a mess.  Baby almost got a naked turtle.  Then I slightly overstuffed the shell which made fitting the shell over the turtle's body a bit of an adventure.  Once I got the shell on the body, I used my DPNs to mark where the legs should go, and carefully slid the shell over the needles to start knitting on the legs.  Technically I was supposed to have connected shell top/bottom by crocheting and the shell and panel with an I-cord... but I went the easy route and just stitched it together using an invisible stitch.

Despite the challenges, it was great fun to knit up such a cute toy.  Once he was finished I really did have a hard time wrapping him up!  I keep thinking I'm going to need to knit myself a turtle of my own.

Now, I know what you're thinking... weren't you knitting a tailgating blanket for this kid?  Well, conveniently someone had devised a pattern for a baby blanket, complete with a pocket for the turtle to ride in.  I switched the colors in the pattern for red, black and white (UMD colors) using Jiffy yarn as it's a nice, sturdy, machine washable yarn, important to have in something knit for a little kid!  The blanket was a quick and easy knit with a ribbed border and body done in garter stitch.  The top and bottom borders are sewn along with the main body, then you pick up stitches on the sides to create the side borders.  My challenge was picking up the stitches on the sides as that is a technique I haven't used across so many stitches before.  Once I got the hang of it I realized that instead of leaving the corners open (to be mitered later), and only picking up along the main body, I picked up through both borders making for some really wonky corners.  Fortunately that was an easy fix!

Despite being my most labor intensive and challenging project yet it was so much fun to do and I'm so happy with how it turned out.  Now baby and turtle are ready for their first Maryland football game! (as for our head coach and team... well... that's debatable. :p)

Thursday, October 28, 2010

Eventually in our lives, be it in a job interview or some sort of personality test or icebreaker, we'll probably all be asked - "if you could have dinner with anyone, living or dead, who would it be?"

I often struggle for a response on this... do I pull something random like Ghandi, so I look deep and spiritual?  Or do I tell the truth?  That if I could have dinner with anyone, I'd choose Rosey Grier.

I find it endlessly amusing, and endearing, that this 6'5" former member of one of the most storied D-lines in football, and former bodyguard for RFK could be totally into such hobbies as needlepoint, and yes, knitting.

When I started knitting, I often heard things like "knitting?  that's something my grandma did." Then one day, a male friend commented that I was knitting, just like Rosey Grier.  Given my love of sports, and not being likened to female octaganarians, I really appreciated the comment.


I was reminded of this today as I watched a You Tube clip of one of my fav blog authors giving a speech, and in it he referenced Rosey Grier.  The blog is 1000 Awesome Things and really a great way to keep yourself in check when the world seems to be crumbling all around you - a feeling I know all too well!  It helps you appreciate the little, simple joys in life - like one of my recent favorites, #396 - when the hold music is actually good.  Check out the site if you have a free minute, or his speech if you've got an extra 20.

Tuesday, October 26, 2010

I love knitting for babies.  Everything is so teeny-tiny and cute and fairly quick to knit.  And baby yarns are so soft and in pretty pastels that no grown person can get away with wearing.

When one of my best friends learned last spring that she was expecting a baby girl, I couldn't wait to knit up something super cute and pink for baby.  I hadn't tackled booties yet and decided to attempt making a pair of booties with a matching hat.

I was drawn to this Cable Baby Booties pattern from Knitting on the Net because I love cable knitting.  I'd been knitting about a year and a half when I decided to try cable knitting for the first time.  I'd always been really intimidated by it because to me it looked really complicated - but it turned out to be surprisingly simple!  It's such an easy way to add impact to something.

I used Bernat's Softee Baby yarn in Pink (I love the look and feel of the softee yarn) and had to drop down a few needle sizes to achieve the right gauge.  I readily admit that I am not one to knit a swatch and check the gauge, I usually just grab yarn and needles and have at it - as a result my first bootie came out just a little large and looking sloppy. The stitches didn't seem to be that snug nor lay right - I could see through some stitches meaning that little spots of teeny tiny baby foot would be exposed, and that's not something you want when you're knitting something to keep teeny tiny baby feet warm.

Ultimately, once I got the gauge situation resolved, the booties were a very quick knit.  I was able to finish two while watching daytime TV.  Started one when Days of Our Lives came on at 1pm, and was finished with both by the time Oprah was on at 4pm.  I'll be glad to return to work full-time, but really will miss having all this free time to knit!

Once the booties were completed, I went on the hunt for a cable knit baby hat.  I loved this pattern from Sweater Babe because of the design it makes at the crown of the hat.  I wanted it to have a ribbon trim to match the booties, so I altered the pattern slightly to add a row of eyelets, then threaded ribbon through and tied the bow. 

I liked the hat so much that I'm going to try to alter the pattern to fit my own head!